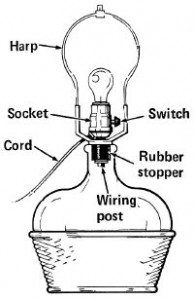
Can’t Find Just the Right Lamp? Make Your Own!
 If you can’t find just the right lamp to suit you or add interest to your Chicagoland home, consider making one. You can use almost anything for the base-a stack of old books, old crockery, a bottle, an old bobbin, even a stack of baseballs. The only criterion is that you have to be able to drill a hole through it. Here’s how to do it:
Materials and Tools:
decorative object to be used as the base
drill with a 3/8-inch bit
block of wood (stained and finished to desired color)
four wooden button caps for lamp base
wood glue
threaded lamp rod with nut and bolt
lamp kit, including lamp cord, socket and harp
hacksaw
screwdriver
file
utility knife or wire strippers
lampshade
Steps:
1. Drill a hole through the center of the item you’re using as a base. It may be necessary to mount the item on a block of wood to create a sturdy base, in which case you’ll need to drill a hole in the block of wood as well.
2. Stain or paint the wooden button caps to match your base. Glue the button caps to the bottom of the base. This will raise the base and allow a lamp cord to pass under it.
3. Using a hacksaw, cut the lamp rod to the desired length and file off any rough edges. Thread the lamp rod through the bottom of the decorative object and wooden base. Use a washer and nut to secure the rod from the underside of the base.
4. To make the lamp cord easier to thread through the rod, place masking tape around the end or the cord. Then thread the lamp cord through the lamp rod from the bottom of the base until you have about 5 inches of cord sticking out of the top of the rod.
5. Thread the socket components onto the lamp cord in this order: the lock nut, the neck, the harp holder and the socket cap. Be sure to screw the socket cap onto the rod securely; this is what holds all the other parts in place.
6. Pull about 2 inches’ worth of the lamp-cord wire apart. Use a utility knife or wire strippers to strip off ½-inch of insulation from each wire, being careful not to cut the wire.
7. To prevent the wires from being pulled back through the lamp rod, tie an underwriter’s knot by making a loop with each end of the wire. Hold the end of one loop in front of the joined cord and the other loop behind the joined cord. Pass each end through the loop formed by the opposite wire and tighten the knot. To be sure the knot is secure, pull on the plug end of the lamp cord.
8. Attach the wires to the socket. To make sure there are no frayed ends, twist the strands of the exposed wire in a clockwise direction. The neutral wire, which is usually ribbed, is connected to the silver terminal. The hot wire is connected to the brass terminal. Bend the wire around the screw in the same direction that the screw will be turned and tighten.
9. Tuck the wires down and fit the socket cap in place. When the socket cap clicks, you’ll know the connection is secure.
10. Add the harp and a lampshade.
Now you have a lamp for your Chicagoland home! Remember, for more involved electrical wiring or lighting solutions, you should always call your Chicagoland electrician.


